Wk 1 - James Bond, discussion
We discussed our next assignment, which is to create a James Bond intro sequence. We watched many past sequences and discussed the similarities or prominent themes/styles used. I like the Goldfinger intro sequence, with the use of projection onto the lady painted in gold.
Similar themes/styles in the sequences include: silhouettes, elements (water fire etc.), women,


I started brainstorming what kind of song I want to use and I like these options although quite different:
1. Love is a losing game - Amy Whinehouse
2. Supremacy - Muse
3. ...........
I then decided that maybe I would attempt to make my own song with the help of some musicians I know at the uni, and make an orchestral / rock song.
Wk2 - intro to After Effects
In this lesson we got an introduction to the basics of animating in After Effects. We looked at animating a logo and also animating a shape. I had some fun and made a weird animation. The videos below show the practice animations I made, playing with the different tools, such as the scale, position, wiggle, and more.
I then took the square animation, duplicated it and overlapped it, changing colours, size, layering to make a Dr. No style James Bond intro. Then taking my final animation, I exported it to the media encoder and the final product can be seen below.
FINAL ANIMATION OF SQUARES:
Wk3 - after effects technniques
In this lesson we expanded our knowledge on after effects. We practiced masks and layering and ended up creating a skull, face, flame thing. I used the Sean Connery's face and a picture of a skeleton I found online. Below shows some screenrecordings and screenshots I took from the program. The screenrecordings show me playing around with he different layer effects to see how the flame changes. The final 4 videos are the ones I exported as my final product.


Final exports:
Wk 4 - green screen intro
In this lesson we went to the green screen room in the university and learned how to operate the camera as well as how the lighting and other elements of the shoot should be, in order to pull good green screen footage. We then filmed a few things to use for our James Bond assignment.
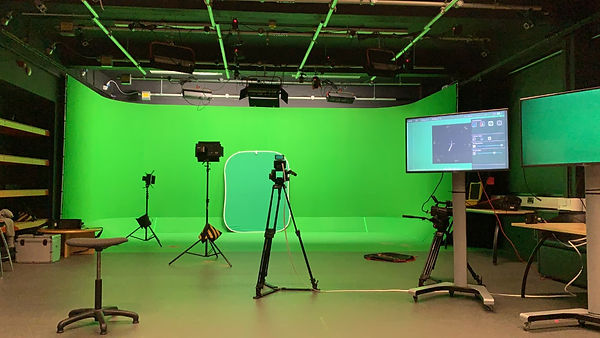

Below shows pictures of the room
Wk 5 - intro to nuke
In this lesson we had our first lecture in nuke and how to key green screens. Using nodes in nuke we keyed out the green background of some footage and then rendered the out and took it into after effects to make a silhouette. We also learned how to key out green screens in after effects using key light. I prefer nuke as to me it makes more sense and seems to be able to get things done more precisely, although I have a feeling it will get very complicated with all the nodes. After effects seemed to be quicker, when removing the green screen.


Above are screenshots taken from nuke and to the left and below are screenshots taken from after effects.
Below shows a silhouette I made from the footage with a colour gradient.


Wk 6 - nuke
In this lesson we learned some more techniques in nuke, including merge nodes and how to get different layers out of. downloaded model from Maya. Using the shuffle nodes we extracted the different layers such as, diffuse, specular, transmission and more, then using merge we merged them together and put them into the viewport. This allowed us to alter the saturation, colours and light of the object using colour correction or grade nodes. Altering it to how we liked it.
Below show some screenshots from Nuke.


we then added a defocus and another grade node, adding some fog to the animation as well as some parts being out of focus. Altered the colour of the fog using a contrast node.
ASSIGNMENT 01
For this assignment we had to make a 10 second video in after effects, using the techniques we learnt so far. I made a James Bond style mini intro using the shape animations, green screen keying, layering etc. in after effects.
Below shows some screen recordings of me working on the circle animation sequence. I did this by making a shape layer and duplicating it, aligning it in a row (horizontally), the taking that row and duplicating it to make columns, aligning it vertically.

After I was pleased with this first animation I duplicated the whole sequence, scaled it up and altered the position and rotation and put an overlay effect on it giving it a cool colour change over the blue circles when they appeared together, this can be seen in the screenshot to the left.
I then worked on a green screen comp. using the key light effect I removed the green screen, adjusting the balance, clip white and more as I thought looked best. I then made colour fill, to give a silhouette effect. After I was pleased with this I placed a smoke footage that I got from a free stock footage website (actionvfx) and I alpha matte it onto the green screen footage, revealing the smoke in the silhouette when it walked by, because the smoke was less in the middle of the shot I tracked the position to the walking of the silhouette.


The video to the left shows the stock footage of the smoke.
After I made the silhouette I played it over the circle animation and I also created a "blood" sort of effect, I used an image of a bullet hole in glass and a video of ink hitting water to simulate blood. I layered these over the animation and faded the end out to red. Originally the footage of the ink was on a white background and I wanted it black, so using the extract tool I changed the white point to make it look black. Below shows the screenshots and original footage of the ink.


FINAL RESULT:
Wk8 - intro to animation in Maya
In this lessonn we learned how to animate a ball to look as though it was bouncing along through the scene. After having learned these skills we had to animate a ball throughout a maze that had been given to us.
Week 9 - lighting
Directional light: shines from left to right (or right to left)


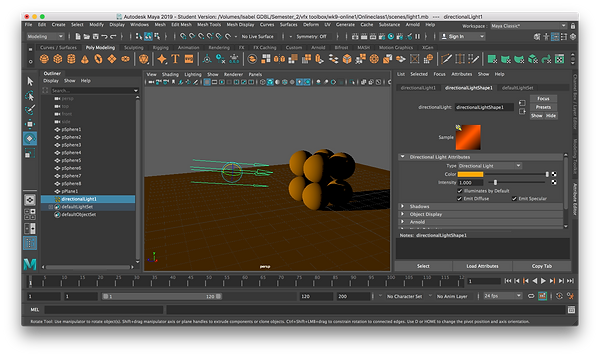

The colour temperature setting in the Arnold light menu is the more physically correct way of working out the colour change in light (measured in kelvins). It changes the colour of the light in a realistic way.

The images below show an Arnold render of 2000K (left) and 10000K (right). This lighting looks much more realistic than when I changed it myself using the colour wheel.


Ambient light: this just adds light to a scene, the light is not emitted from any specific point, therefore there are no shadows.

Point Light: this emits light out in every direction, useful for candles.

Image showing no decay rate:
Image showing quadratic decay rate (more physically correct/natural):

Spot Light: acts like an actual spotlight (on stage etc.), the light source is circular, direct beam of light.


Image showing spotlight
Image showing penumbra and drop-off.
Area light: this is a large flat area of emitting light, generally get a softer light fall and by default soft shadows. It is good for mimicking studio lighting (soft box lighting). When the light is scaled up/down it gets brighter/darker.


Volume Light: doesn't work in Arnold. With this light only what is in the shape is illuminated. Can use colour range to change the colour and select if it shines inward/outward/downward axis.


Arnold light setup
We also looked at the lights that Arnold offers, some of them are the same.
The mesh light makes any mesh object become a light emitting object.
The photometric light is a physically accurate representation of a real world light in which you can upload data from certain lights to mimic them, useful for architectural visualisation.
Portal lights help with lighting interiors, it tells Arnold to direct the light to that area.
Physical sky is a skydome light but it mimics the actual sky and sun.
Arnold renders showing physical sky light (left) and mesh light (right).


Globe animation
I added a 4K earth texture on a surface shader material to a sphere. Then added a grid. I then animated it to rotate. Imported into after effects, added a gradient, added a gaussian blur for a glow effect and an eclipse shape to make the edges a bit darker.


Graphic tunnel
In this lesson we animated a camera flying through a graphic tunnel.
To make the tunnel we drew a curve and then extruded a circle along it. We then animated the camera to follow the curve, added a colour ramp to the tunnel and exported it into after effects.


Week 10 - mash

In this lesson we learned how to animate using mash. We learned about the audio node (and how it is affected by music), as well as the different distribution types such as, grid, volume, radial etc. After learning the basics we used mash to animate a 007 title.


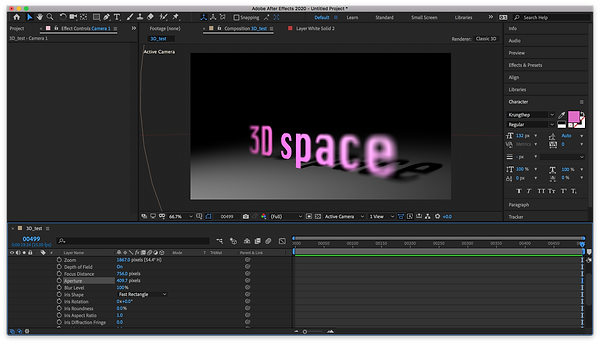
Week 13 - 3D in AFX
In this lesson we learnt how to make something 3D in after effects. We learnt how to manipulate the 3D space and how to add lights, shadows and different effects.


AFX -> MAYA link

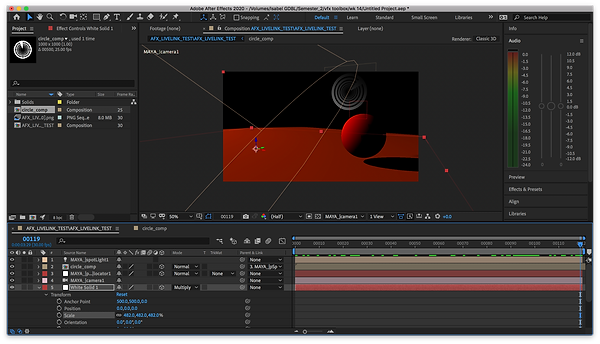
After this we took a disk made in Maya and learnt how to export it to AFX and apply a green screen footage to it, linking 2D with 3D and pairing it to the locator in order to keep the same transformations.


Wk 14 - simple rigging -> AFX
At first, because I asked to learn a magnifying effect, I took a magnifying glass I sculpted and brought it into AFX, with a reflection in the lens already. In AFX I then added a bulge effect and also separated the lens and frame (using a mask) in order to keep the reflection while also being able to see through the lens.


In Maya we imported a motion capture skeleton and a model of a person over. Then using the human ik we attached the skeleton to the model and created an animation. Exported this to AFX and did some graohcis


Assignment 2 ideas
For my final assignment I decided to use pink panther as inspiration.
I decided to sculpt a magnifying glass in Maya. I did this using sphere to create the lens, a pipe for the frame, a cylinder for the handle and for the decorative part I made a curved and extruded on it. I then textured it and rendered it in Arnold. However, because I amusing my laptop I had to change the textures in order to be able to animate and render it in Maya hardware.


I exported the magnifying glass to AFX and separated the lens by also importing a sequence with no texture (just black and white) and using it to luma invert and luma the lens, the below image is a screenshot of the workspace in AFX


I then added a Green screen footage from the green screen shoot we had before lockdown. I also added footage of a fire and imported this in as what we see behind the lens, to this footage I hand animated the bulge effect. The video below is the first attempt at my James Bond assignment.
After this I decided to do the intro to the video. I wanted to use the same style as a classic James Bond intro but decided to use a pink diamond instead of a white circle as I wanted to keep my theme of pink panther and there is also a diamond known as the pink panther.
I created a shape layer and then in a different comp I sequenced them to move across the screen and then up to a larger diamond.


I added a shatter effect to the shape and set it to glass, animated the repetitions and radius as it moved along. I then added a green screen footage and the blood effect using a mask.


My next shot was one of a man standing around some bullets, see the final shot to the left.
In order to do this I exported a mocap animation from Maya and imported it into AFX. Then using some stock footage I found online I tracked the man to a specific bullet making it look like he was a part of the shot.
Using the Mocha plug in from AFX I tracked the bullet I wanted and then added the man to it.
I then animated him slightly turning so that it looked more convincing as well as add a fake reflection by duplicating him and applying a mask.


I then decided to add a sort of psychedelic look to the whole video. To do this I added a radio wave effect to a pink solid, I made it a star shape and adjusted it to suit, adding a spin to it as well. After this I added the kaleida effect.


After this I decided to give the whole video a psychedelic look, adding these sorts of effects to other shots as well.
I took this comp (to the left and above) and added it to the background of the magnifying glass shot.


I made this last shot using a solid with radio waves and then I added a target as well as some green screen footage.


LINKS TO TUTORIALS AND MUSIC USED: