Wk 1 - intro to unity

We looked at a default scene, image to the left, and explored how to move around the scene, scale objects, rotate, change their colour and more.
Then we made a new scene and added our own elements to it and altering to please. Image to the left and video below. The screen recording below shows me going through the scene

Wk2 - Maya practice
In this lesson we learned some basic techniques of Maya in scene organisation. Such as, groups/hierarchy, isolate select, instances, hide selection and more. Then we played with using the sculpt tool, the soft selection with sculpting and stamping textures to make more realistic looking terrains.
This can all be seen in the screenshots and screen-recordings below.
The first 4 shots below show my first attempt using the sculpture tool.


These screenshots below show me using the soft selection tool, as well as the stamp. I imported an image from height mapper, which takes realistic heights from different locations. I also used the stamp collection already included in Maya. My process can be seen in the screen-recordings. I ended up making some sort of alien looking terrain.


Wk3 - Maya modelling pt1
In this lesson we looked at texturing and modelling. I added a leaf texture to a plane, duplicated it and altered it slightly to make the first image on the left there. A sort of leaf branch thingy. Then we were given the next set of leaves seen on the right, I chose one set and altered it to make it look more realistic by bending its vectors etc. We also played with the displacement and more to see how textures change to make it look more flat or more realistic.


Then we practiced some modelling. I made this tree below using a cube and adding curve tools to it, drawing the lines for the branches and roots. The smooth tool was used to give it a smooth look instead of a cube form. I also tapered the edges of the lines in order to make them thinner at the point, giving it a more reality look.


Wk4 - Maya lighting & rendering
In this lesson we learned about the different light types there are in Maya and what effect they have, such as pin light, area light, etc. as well as the shadows and more. We then took a 3D model and played around with the light settings to see how it effects the model. Below are some images of a horse head with an area light, as well as a light blocker.


Then using a model of a skeleton, I altered some pin lights, changed the colour, drop-off, cone angle, penumbra angle and more to change the effect it had. There is one that gives a more disco feel and another which is dark and red, which feels more creepy. I prefer the way the red one looks.
Directly below shows the original light and to the right shows my alterations.


To the left shows the render image I took and below some screen recordings.
Wk5 - Maya/Zbrush - Organic modelling & detail
In this lesson we looked at uv mapping in Maya and how to export a model to ZBrush to add more detail. In Maya we unwrapped a model of a lizard and then exported it as an .OBJ file, opening this file in Zbrush. Then subdivided the model and used alpha stamp stencils to add detail (downloaded the stencil from pixologic.com). after adding the detail we baked the model and exported/imported it back into Maya.


Take the model from Maya and export it to Zbrush using a .OBJ file


Divide the model to get it to be smooth and download an alpha stamp stencil from pixologic.com, import it into Zbrush as an alpha

Sculpt on the stencil and then export it back into Maya by using a displacement map and then import into Maya as a bump texture.

NOTES:
Next time I have to add more detail to the model in Zbrush because when I imported it into Maya the scale skin like bumps were not as visible

Wk 6 - texture and detail
I'm a paragraph. Click here to add your own text and edit me. It's easy.
Assignment 1
I decided to sculpt a forest with a single bench. I used my own laptop as I could not go into uni very often as I had to unexpectedly travel home. My computer kept crashing and the files I saved kept being corrupted so I had to start over many times. Therefore many of the images are from different times. However they still show the skills we learned.
In order to show sculpting skills we learnt I sculpted a tree: Starting with a cylinder I extruded specific faces at the top by creating a line and altering, twisting and tapering the edges….these were the branches.
I then duplicated this tree each time changing it slightly.
I downloaded a tree texture from textures.com and uploaded it to a phong material. When I turned on the displacement mapping the tree looked really weird and as I tried to fix it the program crashed and the file I saved wouldn’t let me open it….it kept crashing every time I opened it. I did this again but with a different texture and the same thing happened (this happened a few times)
So then I decided to sculpt a small, simple bench and I used an image of tree bark as a simple texture (there was no displacement mapping). I then, using the paint fx tool, painted in some trees. I also imported in a sculpt of a girl dancing. I put some willow trees behind, added a HDRI (downloaded from hdrihaven) to a skydome light
In order to show the lighting techniques used I decided to use the sculpt I made in Zbrush last semester and practice different lighting angles on it. I used a light blocker and area lights.


Above Images showing trees I sculpted.
The image to the left has roots that I painted on using the paint fx tool


Above shows images of how I used hyper shade to add texture. However after I made the displacement map visible it turned into this gross looking tree and my computer crashed and the file that I had saved kept crashing each time it was opened. I tried the displacement map again on another model and the same thing happened.


Week 8 - intro to substance
Downloaded the skull model provided and opened it in substance painter. Then baked the mesh map and added an iron raw damaged material and a red fill layer.


Added a mask and a metal edge generator, this means that the edge wear effect was masked for the areas that are black in the mask and the areas that are white are revealed, therefore the red fill layer was inanely applied to the edges, so I reverse this effect by inverting the mask.


For detailing I added alpha stamps, I set the base colour to my choice and turned the height value down in order for the stamp to indent into the skull. I then used iRay to render the image.


Week 9 - substance > unity
Week 10 - substance > Maya
Open the Jade toad sample in substance painter. Export textures, preset Arnold 5, and export the mesh as .OBJ
In Maya import the .OBJ mesh and open hyper shade to start making the material.


in the hyper shade I created an aiStandardSurface material and set each texture to its specific slot. After this I selected these file nodes and set the correct colour space and alpha is luminance based on the document below. I then dragged the material onto the mesh in the viewport, added a skydive light and an HDRI and rendered it our using Arnold.


Assignment 2
For this assignment I downloaded a model from CGtraders.com of a gibson electric guitar. I then imported it into Substance painter and I textured it by painting the separate UVs. I separated the textures into folders and I used smart materials as well as normal ones, I created a black mask and then painted where I wanted the material to be, adjusting the scale and height etc. as necessary


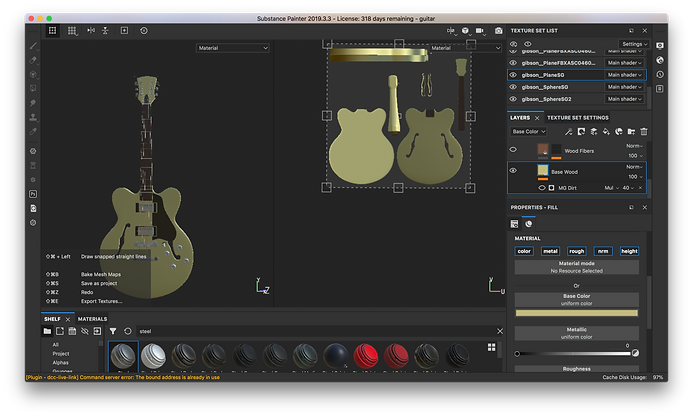

Using iRay render on substance I rendered it out in different positions.
See the final images below
FINAL IMAGES


Assignment 3
For this assignment I decided to show my progress by modelling and texturing a gramophone. I did this by modelling in Maya and texturing in substance painter.
For the model I used a reference image.
I used cylinder to manipulate into the cone of the gramophone, manipulating the vertices to suit, using extrude to make the ridge and then apply the smooth mesh.
I used mainly cylinders to make the other parts of the model, such as the connection piece and the record and record holder.
For the base I used a cube and I extruded the top and bottom to make it a bit more decorative on the edges. The needle was made with a very small cone. I then added details like the decorative plaques on the side of the body and the legs.
I exported this as an fbx file and I imported it to substance painter, where I textured it using the same techniques as in assignment 2.


FINAL IMAGES


