Wk 1 - Intro to nuke
First stared with a colour wheel image and practiced using the nodes to do some basic animations.


We learned about merge nodes and how to merge backgrounds and foregrounds, making sure the B channel goes into the background and the A channel goes into the foreground. The first ones were very simple with just one merge node.


Then we started having to use multiple merge nodes to merge many different things instead of one background and foreground. The B channel connected to the merge nodes before that were to go behind it.
To the left shows two images of the node graph before and after I added the merge nodes to get the final image (below).


Images showing the nodal tree in order and the final shot it produces.
The video below shows a run through of all the different shots and how the merge nodes bring them together to create different things.
Wk 2 - basic rotoscoping
In this lesson we learned basic roto skills and how each pen tool works. After covering this we rotoscoped two sweets and the roof of a building.
This video shows me trying out all the different pen tools.


Above shows the sweet that I rotoscoped out of the shot. I first made a copy node and then added the rotoscoped node and traced out the sweet I wanted (also added a blur node).
To the left shows a video on the sweet on a background. In this video I manipulate the colour of the sweet using the grade node.


Above show screenshots from a rooftop sequence. I selected a rooftop and animated the roto over it (changing it to green). The same technique as the sweets was used, and then once this was done I went to another frame and altered the shape to fit it there (this keyframes the animation). Below shows the video (the beginning is a little off as I did not start the roto on the 1st frame.
Wk 3 - Advanced Roto
In this lesson we continued with roto. We practiced by rotoscoping a hand....starting with the thumb and the an index finger.


The two images on the left show the before and after I rotoscoped the thumb. The video below shows the points that I added using the bezier and B-spline tool.
I then went and rotoscoped the index finger. this was a bit more difficult as there was more movement. The video to the left shows me rotoscoping it and the image on the right shows a screenshot with the motion blur applied.

After this I decided to attempt and roto the whole hand. I continued this process of making breaking his hand up into different shapes


Basic Keying
In this lesson we learnt the basics of Keying. In the first exercise we had to replace a sky with another. This was done by adding a Luminance key and adjusting the black and white so that the sky was as close to fully black as possible without distorting the image too much. Using a roto node we cut out the remaining part of the sky and the pieces that we wanted to keep the highlights (e.g. over the houses in the background). Using a lightwrap node to soften the edges of the trees and a premult and merge node to bring it together.


To the left sows the nodal graph for this exercise.
We then repeated this process with the replacement of a sky from another image (see below).


In the second part of the lesson we learned how to key out a green screen. We did this by adding a key light, crating a garbage matte, getting rid of the green along the edges of the hair (this could be done either by copying in a despill node or by creating a new key light and putting the value of green to 1), merging all these together.


Using these techniques I tried to remove the green screen of another set of footage we were given. Although it was trickier as part of the footage had a partially see-through element.


Advanced Keying
We began by adjusting the keying we did last week, this was done by adding an additive key to keep the detail in the hair an also adding grading to make it look more realistic so the colours would match.


Next we learned some advanced keying. We keyed out a shot from Alice in wonderland. We had to key different sides first and many separate times as there were different shades of green and see-through materials on the clothing.
The first step was to reduce the noise using a Denise node, this is important if not it can result in a bad key. We then roto the more detailed parts such as the hair or parts of the dress, adding key lights to get better alphas, merging them together, keeping the detail. First we did the right side of the image then the left. At the end we added a permult node and merged it all.


Tracking
In this lesson we learned how to track footage. First we started with something simple. We were given a comp and we added a tracker on a sign in the back in order to cover it.
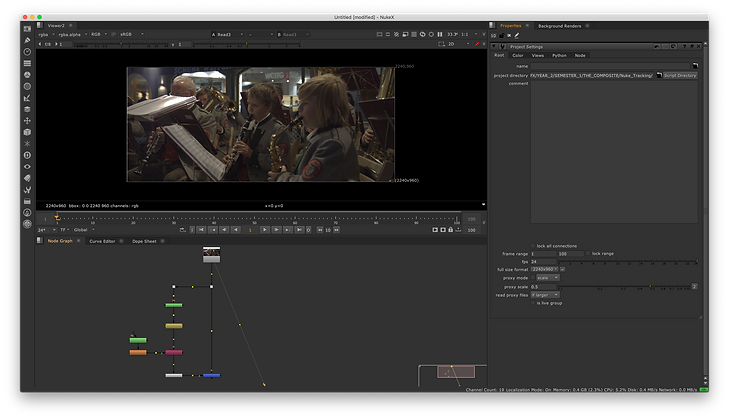
Then we tacked a roof, this was a bit more complicated as it rotated when it moved but that was solved by using two trackers and turning on the rotation option on both.


Lastly we learned planar tracking, rotoscoping out the windshield of a car and using planar tracking to get a basic track of it. Then baking it, creating a corner pin 2D node. Then adding another basic roto of the windshield and a grade (just to be able to see the tracking). After adding the corner pin node to the new roto and grade, I went back and manually adjusted the roto where it went wrong. At first the planar tracking did not go well so I had to redo it, then I repeated the process for the license plate.


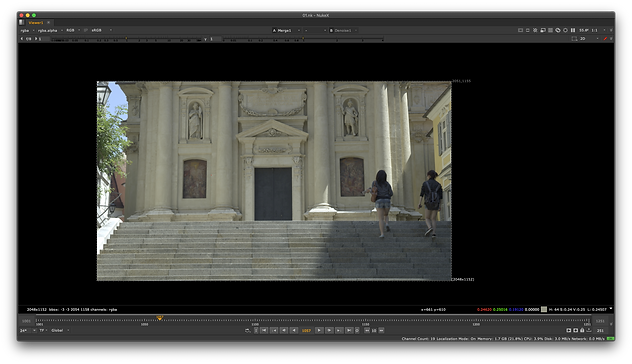
Grading
I'm a paragraph. Click here to add your own text and edit me. It's easy.


below I practiced some different ways to grade by, using keyer or roto.
Next I worked to grade an image, by grading three different elements within it. First I started with the statue, using different grade nodes to change the luminance and the colour, making it fit the scene better. Then a keyer was brought in and attached to the copy node in order to bring the luminance values up to enhance certain parts, this was then masked to another grade node.


This is my finished grading shot, everything went alright, except for the castle on the right. With this I found it hard to match the luminance without making one side too dark or bright. I think it might have to be done in two parts but I couldnt seem to get it right.
Cleanup & patch repair
In this lesson we learned about the clone tool and how to remove different elements using it. First we practiced our techniques by removing markers from a green screen and then we removed people from a scene.

In this exercise, we had to remove the old man from the footage. Using the tracker node and tracking the step to get the fine movements and then a framehold was used on the hero frame (of the shot without him in frame), using a roto a rectangle was drawn around him on the frame hold (using a blur node to make it less hard). After adding a prebuilt to bring it all together a multiple node was added for when the girls walked by where the roto was (so that they would not disappear behind it), a Denise node was also added.


Complex clean up and repair
In this lesson we took what we learned the week before a bit further and removed a group of people out of some footage where the camera was moving. This was done by rotoscoping behind the group and tracking it (cornerpin node) and a framehold. Using a copy node and a new roto shape around the people, rotopaint was used to to clone the different ground over the people and the step. A grade node was used to match the lighting.


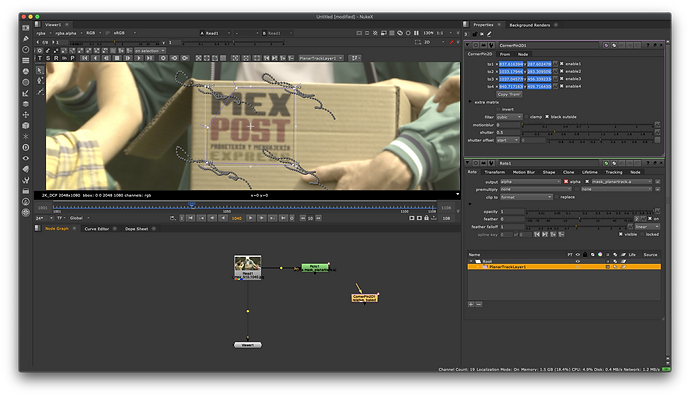
Advanced clean up
In this lesson we removed a label from a box by using rotopaint, grading and more. We then had to add back in a shadow from an arm.


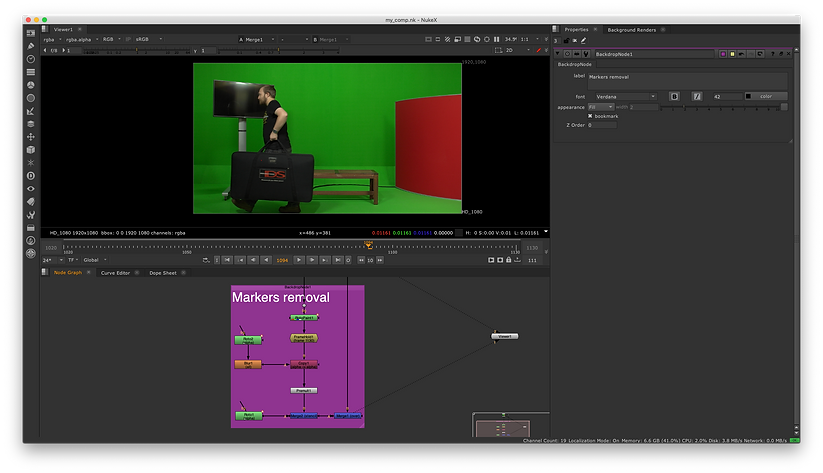
FINAL ASSESMENT
For this assignment we had to alter the footage below, removing the markers, altering the green screen and the tv screen and removing the logo from the bag.
First I started by removing the markers on the green screen by adding a framehold, using the clone tool and painting over them, then I rotoscoped them out as well as Tim's head as he passes over the markers, merging everything together.

Next I changed the tv screen. I did this by adding a cornerpin and transform node, and then a grade node to match it to the scene better as the green on the tv was brighter than the green in the background, I also desaturated and defocused it, then rotoscoped out Tims head as he walks by and merged it all together.


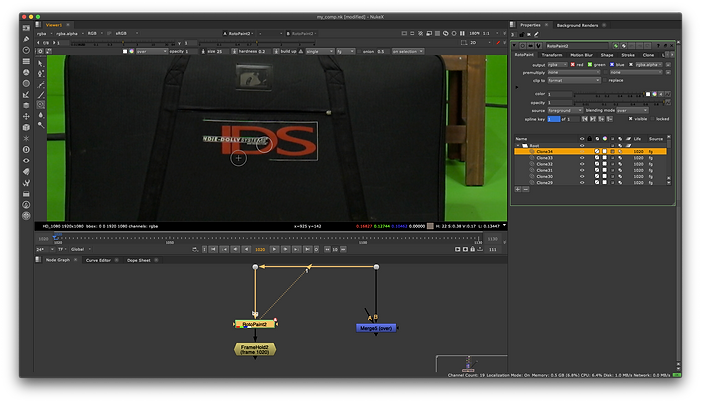
Next up I removed the logo from the bag. To do this I added a framehold, rotopainting out the logo, tracking the logo using planar tracker and then adding grade nodes on both sides of the patch as they were different colours throughout the clip. I merged it all together.

Lastly I keyed out the green screen using a Denoise node at first, two key light nodes, altering the luma until it fit, then I added the blue colour node, and a despill madness, merging them together.
